Sunday, December 4, 2011

Pumpkin soup

Halloweens already far behind us and everyone is probably busy with Christmas, but even so I´d like to share this recipe I made around Halloween which also makes a perfect starter for your Christmas dinner. I present you this lovely creamy pumpkin soup!
Note: try searching pumpkin soup in google and you’ll find a million varieties. I found quite a few recipes and decided this is the most basic version that you see in every sort of pumpkin soup. Feel free to use google and add a lot of extra ingredients to make this pumpkin soup more special!

Photobucket

Ingredients:
2 cups pumpkin flesh
1/2 union
1 cup vegetable (or chicken) stock
3-5 spoons heavy whipping cream
salt & pepper

Optional:
1 clove garlic
herbs


1. Start with turning the pumpkin flesh into pumpkin purree. You do this by cooking the pumpkin in a pan. Keep stirring, while making sure the pumpkin doesn’t burn. Natural liquids should come out at this point, if not and you feel the mixture is too thick or burns easily, add water or stock.
2. Once you have the pumpkin purree, add the onion, stock and any other ingredients you like.
3. Add the cream at the very last moment and serve immediately.

Photobucket

I love the way this soup is so very creamy. The soup was a tad salty from the stock, very creamy and had the unique taste of pumpkin. It´s a pity you won´t be able to make this soup all year round and we definitely don´t sell them a lot in Holland in the first place. I´m definitely going to try making this more often, perhaps adding more ingredients to see what effect it has. Although I have the feeling, that this soup, however plain it may seem, is already a very nice mix of flavours that really doesn´t need improvement.

Tuna? Yes!

Before I was smart enough to buy small cans of tuna, I had these massive large cans that I needed to use for two or three consecutive days. I quite like tuna, but at some point your imagination is running dry and you kind of end up making the same things over and over again. So apart from dumping tuna in noodle soup or making Tuna salad like in one of my older posts, here are two other suggestions: Tuna melt and Tuna pasta salad.

Tuna melt
Ingredients:
Bun
Cream cheese
1/2 can tuna (in oil)
1 tablespoon mayonnaise
A few chives
1/2 Italian salad mix (3 types of lettuce, onions and cherry tomatoes)
Salt & pepper
Cheese


1. Start with cutting the bun in half or take one slice of bread. Spread with the cream cheese.
2. In a small bowl add the tuna with mayonnaise, chives and some salt & pepper to make a tuna salad. Add garlic and herbs if desired.
3. Put some lettuce on the bun (or add this later if you dislike lettuce that’s been in the oven). And spread the tuna salad over the bun with cream cheese. Add anything else you like as well, like tomatoes, paprika or onions.
4. Add slices or grated cheese on top and season with more salt & pepper if you want (just don’t overdo it, remember you can always do this later as well).
5. Put another slice of bread or the other half of the bun on top and pop it into the oven at 180 degrees Celsius or 350 degrees Fahrenheit for about 5-10 minutes when you see the cheese has melted. Tadaa! Bon appétit!

I’ve made ‘tuna melt’ quite a few times before, however I like to call it tuna panini’s because panini’s are definitely my favorite buns to make this with. I also put them in a grill/tosti-machine instead., but essentially it’s all the same and it always tastes different! I like to add or leave out different things every time and just try to work with what I’ve got.

Photobucket

Tuna pasta salad
Ingredients:
Pasta
1/2 Italian salad mix (3 types of lettuce, onions and cherry tomatoes)
1/2 can tuna (in oil)
1/2 paprika
A few chives
Spoon olive oil
Salt & pepper


1. Cook the pasta until it’s done, drain the water and set aside to cool.
2. Cut, slice, chop, wash and drain from olive oil: the tuna, the salad mix and the paprika and mix together.
3. Add the pasta and mix again and season with olive oil, salt & pepper to taste!

For another version of this: leave out the lettuce and add a bit of cucumber, yogurt and mayonnaise. It was my hybrid version of of this tuna pasta salad and tuna salad I posted before. It was delicious!
For this salad I bought a salad mix because buying 1 lettuce was as expensive as the whole salad mix and I didn’t want to pay too much for tomatoes and lettuce (which is all I wanted), because they don’t last long and I don’t really eat them enough. While typing this I realized I completely forgot the corn. I thought it would be really nice to add corn as well, but I obviously missed that now! For next time!

I hope you liked it! Enjoy!

Monday, October 17, 2011

Kitchen notes: Keepers

As you might know I’ve been cooking for myself for a few weeks now already. There’s a lot of recipes I tried and things I failed on. There's a few things I'd definitely would never make again (take bacon for instance) and some things that I could do daily (take spaghetti). Here’s a few of the recipes I decided to keep:

Panroasted chicken with Caramelised Balsamic Vinegar

You’ll be needing: chicken, sesame seeds, caramelised balsamic vinegar.
How to’s: Put the chicken in a pan and cook it with sesame seeds and a bit of the vinegar. Sprinkle vinegar over when done.
Notes: Caramelised Balsamic Vinegar is heaven. I’ve cheated on this and not actually made it myself but bought it like this, but I will definitely try making it myself one day. The sweet but vinegar-like taste definitely suits the chicken.

Photobucket

Pasta olio (or whatever)

You’ll be needing: pasta, herbs, garlic, oil, salt&pepper
How to’s: Cook the pasta, bake the garlic lightly, mix everything together.
Notes: I’m not a fan of the oil I bought, which is really the main ingredient in this recipe. Buy oil you like the taste of or this will definitely fail. When done well, it’s a really nice side dish.

Photobucket

Filled mushrooms

You’ll be needing: mushrooms, chimichurri (or pesto), cheese
How to’s: Fill the mushrooms with chimichurri and add cheese over it. Pop in the oven for a bit.
Notes: This is really nice as a luxurious sidedish. My mom makes this every Christmas or special dinner. It is one of the easiest things and it tastes nice as well.

Photobucket

Bacon with chimichurri dressing and fried potatoes

You’ll be needing: bacon, chimichurri (or pesto), potato, oil and salt
How to’s: Fry the bacon in a pan with oil, top with chimichurri. Fry potatoes in a pan with oil and add loads of salt (this it bad).
Notes: This is definitely not one of my healthiest dishes, but it was really nice anyway. Everyone has to love fried potatoes. The chimichurri (or substitute with pesto if you don’t have any and don’t want to make it either) give the bacon a lot of extra taste.

Photobucket

Mushroom cream spaghetti

You’ll be needing: spaghetti, garlic, mushrooms, cream cheese, salt & pepper
How to’s: Cook the spaghetti and bake the garlic and mushrooms in a pan. Add the spaghetti to the mushrooms and cook for a bit longer then add cream cheese and let it melt. Take off the fire immediately and add salt & pepper.
Notes: Love, love, LOVE this recipe. I have a thing for mushrooms. Somehow they appear in every recipe I make. Really love the creamy taste to the spaghetti as well. I have to test other recipes though. It might work better with something like whipping cream, or a different cheese. Might make this a weekly thing.

Photobucket

I have all the time in the world here to cook whatever I want (at least until the essays start getting closer) and I have a whole kitchen for myself (if I start cooking very early or very late). It's amazing. However, I don't have all the money in the world and I should really start thinking of a way to manage it. For now, I will just enjoy all the food.

Carrot cake Smoothie

Yes, it exists! Well, now it does. Since I decided to make a smoothie with the ingredients I had left from preparing a carrot cake. I really liked the taste of it as well. Since I didn´t add any of the sugar, vanilla essence, maple syrup, etc. yet it was quite healthy as well!
Okay, so it doesn't look as good as you might want it, but what do you expect? Carrots, dates and raisins don't blend into the most beautiful colours. I promise, though, that you will completely forget about what it looks like once you taste it!

Photobucket

Ingredients:
Handful grated carrot
2 spoons raisins
2-3 dates
1 spoon grated coconut
bit of orange zest
3-5 spoons apple juice
(Greek) yogurt


1. Put all the ingredients except the yogurt in a bowl and leave to soak for a bit.
2. Add the yogurt to the bowl and mix.
3. For an unhealthier version: add sugar or maple syrup and vanilla essence. Walnuts also go with this very well.

I still have a lot of recipes waiting for me to type them all out. I was thinking of writing a post on kitchen notes, since most of them are just 2-step recipes with horrible pictures (my photographic skills decreased since I’ve been in Belfast), but still quite worth writing down. At the very least I need to remember the recipes I make so I can keep improving and find the perfect recipes!

Thursday, September 22, 2011

Quick & Easy salad 2: Tomato & Paprika style

I’ve just mentioned my Chicken and mushrooms in crème fraîche sauce-dish (which needs a fancier name really) and said something about making two other dishes in those 30 minutes. Here’s one of the others. It’s a really simple salad, which unfortunately I can’t really call simple salad anymore since I already have a salad named that way. I’m going to anyway though. This is my Simple Salad 2: Tomato & Paprika style!

Photobucket

Ingredients:
Handful cherry tomatoes (I counted 6)
1/4 yellow paprika
1/2 mozarella
Chives


1. Just cut everything in desired size.
2. Do mix before eating.
3. Yeah, that was it really.

Tadaa! I’m so brilliant at writing salad recipes! Maybe I can try making money out of this, I know people have! If you want to make it a bit fancier throw some salt & pepper into it somewhere or add a salad dressing or even some oil. Isn’t it great? Anyone can be a master chef like this.
P.S. Do mind your fingers when cutting.

Photobucket

Chicken and mushrooms in crème fraîche sauce

It´s been a while since I´ve posted something (again), but this time I have a good excuse! I moved to Belfast to study here for half a year. It´s awesome so far! However, cooking is hell. I find myself going to the supermarket every single day . When I finally think I have everything I remember something else I need, or I run out of milk and have to go again anyway! I´ve never had to think this much before buying anything. I´ve never really had a budget I seriously had to keep. Also, I´ve never really shopped & cooked for one person only. This recipe is something I came up with today, but you have to want as well. For instance, the mushrooms I’ve had in the fridge for a few days now. I use them in every single meal! You only need a spoon or two crème fraîche which leaves you with the whole rest of the package. You can buy lots of chicken fillet and just freeze the rest, no problem. But things like chives have an expiry date as well at some point!
If anyone has any brilliant ideas on how to cook for just one person, let me know.

Photobucket

Ingredients:
1 spoon oil
1 chicken fillet
2 mushrooms
1-2 spoons crème fraîche
a bit of chives


1. Fry the chicken in the oil until its thoroughly ready or white.
2. Add the mushrooms and wait until these are cooked as well.
3. Take the pan off the heat and add the crème fraîche straight away and stir it in.
4. Cut fresh chives over your warm dish to decorate.
5. Add salt & pepper during any time for taste (I should’ve!).

And there you have it! I think this looks like a really luxurious Christmas dish because of the cream. It’s really quick as well (although it might depend on how much you’re making). I made this and two other dishes in about 30 minutes time. Also, if you know how to not burn your food, you can’t go wrong. It’s really not complicated to make. Do remember not to add the crème fraîche any time sooner. I’ve made pasta with crème fraîche before and if you cook it for too long it just disappears.

Photobucket

Anyway, Enjoy! (with capital E, yes.)

Thursday, September 8, 2011

Banana cake with Lemon icing

Another recipe I made for my dessert table! This is like the sophisticated version of the Banana Teabread I made before and it’s just as delicious! The lemon icing adds some extra fresh taste to it as well.

Photobucket

I’ve done a little experiment with the ingredient list and steps. I opted not to leave the steps out and turn it into one long story of what to do as I personally find that really unhandy and disturbing. Do you think it looks any better now I've shortened all the measurements? Or do tbsp and tsp tend to confuse you as well? Are the steps easier to read now?

Cake:
250 g plain flour
1 1/2 tsp baking powder
1/2 tsp salt
115 g butter
225 g sugar
75 g light brown caster sugar
2 eggs
1/ 2 tsp grated lemon zest
2-3 bananas
1 tsp vanilla essence
50 ml or 4 tbsp milk


- In one bowl, sift together the flour, baking powder and salt.
- Mix the butter with both sugars until light and fluffy in a separate bowl. Beat the
eggs in one by one and stir in the lemon zest.
- In another bowl mash the bananas (or use a blender) and mix in the vanilla essence
and milk.
- Add the banana mixture and the dry ingredients to the butter in a few additions,
alternating between the two of them. So, add a fourth of the banana mixture and
carefully mix it in. Then add a fourth of the dry ingredients and mix in. Then back
to the banana mixture, and so on.
- Preheat the oven to 180 degrees Celsius or 350 degrees Fahrenheit and bake the cake
for about 30 minutes.

Photobucket

Icing:
60 grams butter
250 grams icing sugar
1/2 tsp grated lemon zest
4-5 tablespoons lemon juice


- Mix the butter until light and fluffy and gradually add the icing sugar.
- Mix in the lemon zest.
- Now beat in the lemon juice spoon by spoon until the consistency of the icing is
just right. Add more icing sugar if you accidentally make the icing too running and
add more lemon juice if you believe it is too thick.

I just only half the icing used in the recipe I looked up, but it was more than enough to cover the cake. However if you find yourself wanting to make a layered cake or feel for more decoration than you can always double the icing! Also, if you feel a skewer comes out of the cake dry, you might want to leave it in the oven a little longer anyway. In my case, banana cakes or bread all tend to come out a little thick on the inside. Somehow I can’t get them to the perfect consistency.
I think I’m keeping the numbers for the steps, just because I like it. However I can use a BOLD script to indicate >recipe here<. When looking at blogs a lot of the times I completely skip the nice story around the post and skip straight to the recipe! That’s kind of evil isn’t it?
Anyway! The cake! It’s a really nice cake especially if you’re going for fresh. It suits any summer party with the fruity flavours. However this would also work perfectly in winter (oh, maybe with chocolate icing?). I know I haven’t found a lot of cakes that weren’t worth making, but believe me, this one is worth making as well!

Wednesday, September 7, 2011

Smoothie shots

Although this was one of the easiest things ever, I thought I’d write a recipe for these cute smoothies as well. I used this recipe on my sweet dessert table (check it out!). Basically it’s just layers of mashed fruit and you can make any combination you can think of. But here’s what I ended up using:

Photobucket

Bottom layer:
Sugar melon
Green grapes


1. Remove all twigs and peel, slice the sugarmelon into smaller pieces and mix everything with a blender.

Middle layer:
Raspberries
Blueberries
Yoghurt


1. Put the raspberries and blueberries in the blender and add a spoon or two of yoghurt.

Top layer:
Strawberries
Banana


1. Put everything in your blender again and mix!

Photobucket

To make the layers:
1. Start with the first ‘smoothie’ and put two spoons into the glass, depending on how large your glasses are.
2. Very gently pour the second smoothie on top. Start with half spoons so the smoothies don’t sink into each other and blend.
3. And at last add the top layer. Use a grape to garnish and done!

Photobucket

One of the easiest and quickest things I’ve made from the whole dessert table and in my opinion also one of the most adorable things on it. Grapes might actually not be the best garnish for smoothies. As you can see they sink into the smoothie a bit. Of course, strawberries always work as decoration.
Me and my mom have been looking for the perfect kind of glasses for a few years now. We never found anything that was really worth it and it was always really expensive with prices ranging from 6 Euros to 20 or more. This set cost me 3 Euros including the spoons. I put these little glasses on a plate I got from a Japanese set I bought a while ago (it included bowls, plates, spoons, chopsticks and little sauce bowls). That plate is standing on an upside down oven tray. I tried to use so much stuff I already had for decoration or to add some 3D into the table. Would you have thought of upside down oven trays?

P.S. I wouldn’t have either, but they were right in front of me when I needed ‘something higher’.

Blueberry Lemonade

I’ve seen a lot of recipes trying to find the perfect one for this. And they all really come down to the same thing really. A few blueberries, a lemon, sugar and water and you’ve got blueberry lemonade. So I just used the same recipe from my Home-made Lemonade I posted earlier and added some blueberries. You can keep the lemonade quite a long time, however you can’t when you add blueberries. After one and a half day it started getting fizzy and tasted slightly off. In my experience berries tend to go off veryvery quickly, so best drink this within a day.
Note: sorry for the lame picture! I swear it's the only picture of my dessert table that isn't perfect!

Photobucket

Ingredients:
1 cup sugar
Zest of half a lemon
Juice of three lemons
1 cup blueberries (or: 1/2 -3/4 cup blueberries and add blueberry juice to make 1 cup)
3-6 cups water


Now there are two ways to make this:
1. Just throw everything into a pan (start with 2-3 cups of water), boil it, squeeze the juice out of the blueberries by mashing them a little, sift it later if you like and pour into cups. Add more water to taste.
Or:
1. Put the sugar, blueberries, lemon zest and 1-2 cups of water in a pan and boil it. Once boiled and all the sugar is dissolved, leave to cool.
2. Juice the three lemons and add the juice to the blueberry juice. Add more water to taste.

The amount of water really depends on how you like your juice. If you like it to have more fruity flavour: use less water and also less sugar. If you like to to be sweeter: add more sugar. If you’d like not to be overwhelmed by sweetness or lemon: add more and more water. You can alter this recipe to totally fit your taste! Which you can also do by adding a different kind of berry. Strawberry & lemon might be a very nice combination. Or blackberries & lemon, like jam I made before. (Which reminds me I'm still behind on posting!! - like always)
Hope you enjoy!

Berry dream with Greek yoghurt

This recipe I looked up for my dessert table. I stole it from one of my moms old cooking books. The recipe suggested you eat it ‘pure’, but I decided against it and I'm glad I did. I wanted to use this very berry stuff (for serious lack of a better word) as a sauce on top, but ended up doing it the other way around. I’ve altered the recipe since I didn’t have all the ingredients and wanted it to have more berries. I also added a lot more water than necessary. Here’s the recipe I ended up with:

Photobucket

Ingredients:
125 grams blueberries
125 grams raspberries
125 grams strawberries
125 grams blackberries
125 grams sugar
200 ml + 1-2 cups water
1 package vanilla pudding powder (for 1/2 liter)


1. Wash and clean all the berries. Remember to take off any leaves etc.
2. Add all the berries with the sugar and water together into a big pan and bring to boil.
3. Add 3-5 spoons of water to the vanilla powder to make a thin paste. Add this to the berries. At this point the mixture will become very thick very quickly. Keep adding water and stirring until end up with a ‘thin jam’.
4. Pour the berry mixture into glasses and leave to cool. Add yogurt on top of it later.

Photobucket

I know it takes a lot of berries. It could be a very expensive recipe if the berries aren’t in season, but it doesn't actually take a lot of each. 125 grams is about a handful with two hands full being the absolute maximum. So don’t get into shock just yet.
I’m not sure if it makes any difference but I used caster sugar in stead of granulated sugar. This was because on the one day I needed a lot of sugar we suddenly had none at all in the whole house which normally has at least 3 spare kilo’s of it. Luckily I had some caster sugar or I wouldn’t have known what to do. Imagine making a super sweet dessert table and while you’re baking notice you have no sugar?!!

My sweet dessert table!!

I made a dessert table! A REAL one! Can you believe it?! I decided to make one because there are so many lovely sites with lovely pictures of others doing it and it looks so wonderfully delicious. I had to have one! Since dessert tables aren’t really known here I decided to just make one myself. That way I could make it as perfect as I wanted.
I started with picking a theme. The hardest part about arranging a dessert table is picking the theme. It took more time than all the baking together. I had various theme’s in mind, but I also had to take the materials I had into account. I really love the sort of Victorian swirly style so I thought of making a theme around that. I had a few glasses with that theme on it, in red. From there I just worked around it. The colours would be red, black & white. The main theme would be the swirls.
The next step was looking at all the dessert tables online and finding little things I liked or things they had in common. For instance, most of the dessert tables have cupcakes. You can’t really do without cupcakes, so I put cupcakes on my list. Next was those massive candy jars with I think are just totally adorable. Now I didn’t have any massive jars, so I filled the pretty glasses I have. Then, I almost forgot, a massive cake, which is also totally unmissable. I had seen cute popcorn cones. I had to have bonbons or little chocolates or fudge or something bite-sized. To make the dessert table slightly more bearable and healthy I could add fruit. I needed drinks, I needed cookies, I needed loads of sweets. I’ve made uncountable lists of things I wanted and needed and must have. I’ve made more and more and narrowed them down and came up with more creative things or found something totally adorable, etc.
When I had finally decided on the ‘menu’ and I knew what it was supposed to look like, it was time for the actual decoration and finding of jars, bowls, glasses and so on. I wanted everything to be either white, black or glass as to not destroy the theme. It wasn’t that hard to find all the stuff I needed right here in my house. So I started checking off my list with what food I wanted where, and when I finally had it all I went on to the cards. A lot of dessert tables have little cards with a note on what is on the plate behind it. I used Photoshop to make cards of my own and added a butterfly theme to it, as I had the cutest butterfly nameplates (which in the end I didn't even use!). The invitations I made had the same theme to them.
When I was finally sure I had organized about everything, it was just waiting for the big day to come. Or rather the day before, so I could start baking everything I wanted.

So here’s what it ended up looking like from a distance: (let's stop talking and actually show what I've done)

Photobucket

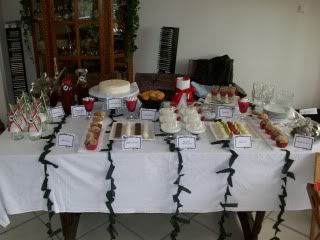
I didn’t have the leisure of an empty white wall I could put the table against and paste decoration on the walls. But it didn’t really matter in the end anyway. I put a little side table on one side with tea, hot water and teacups on it. In case anyone wanted tea (they did). Here’s a close-up:
Note: you see that caramel apple tea in there? It's absolutely delicious! I recently bought it because I'm totally addicted to strawberry caramel tea but they didn't have any!

Photobucket

Can you see the little butterfly I added to fit the theme? My printer didn’t want to print anything without stripes though. So we just had to put up with that.
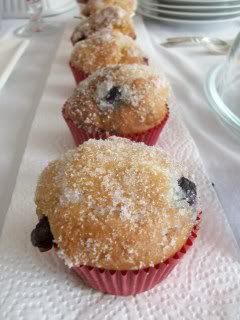
Oh look! What have we here? The unmissable cupcakes, disguised as Doughnut muffins with blueberries. They’re really as yummy as they look!

Photobucket

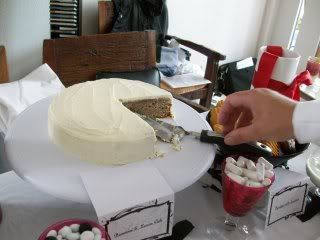
Another unmissable part of a dessert table is a cake. I made a Banana cake with Lemon icing. A sophisticated version of the Banana teabread I made before with a lemon icing.

Photobucket

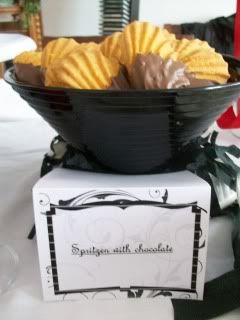
Apparently we couldn’t do without cookies either. So here are the cookies I used! I cheated on this actually. I bought spritz cookies from the store and just dipped them in milk & dark chocolate.

Photobucket

More things I cheated on: Raffaello and Choc&Fudge. They’re so delicious! I could never copy them or come up with a better alternative to make.

Photobucket

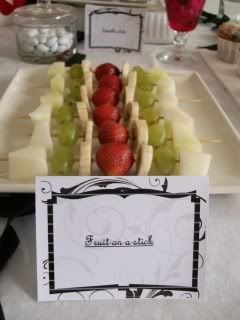
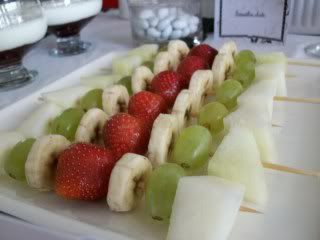
Oh yeah! Here comes the healthy stuff. Fruit on a stick, or skewered fruit. I was afraid no one would understand the word “skewered” so I decided on this. Don’t ask me why I insisted the cards were English and not Dutch. I just like the way it sounds better. It's a pity the banana had gotten a bit brown in the half hour it had to wait to be eaten. But doesn’t it look really nice and colourful?
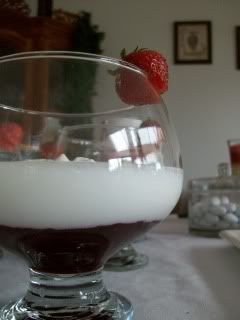
Photobucket

Photobucket

Here you see Berry dream with Greek yoghurt – and a strawberry as decoration. This was so delicious! I’m definitely going to have to make this over and over again. Plus it looks quite good as well don’t you think? I love the pretty glasses as well; I’m totally going to need some of my own.

Photobucket

Photobucket

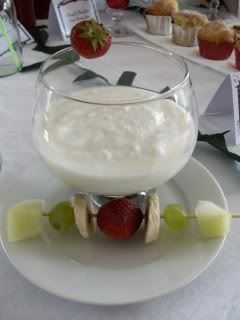
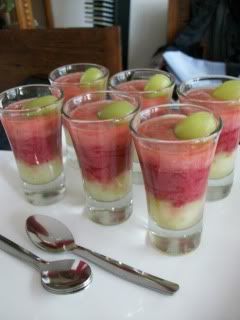
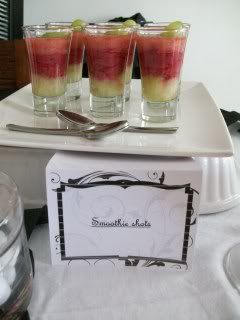
To stay in the healthy fruit direction: Smoothie shots! I made the name up myself, not bad right? They also look pretty delicious like this. Note: there was absolutely no alcohol in these like normal shots tend to have.

Photobucket

Photobucket

Oh! The picture spam! I just can't help but show off a little. I think some of the pictures came out so pretty!
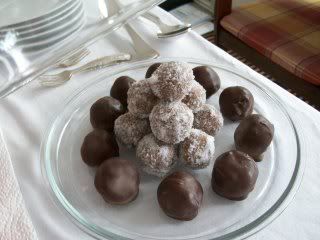
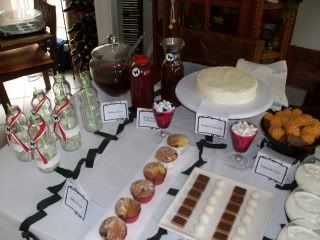
On to the chocolates: I made the bonbon version of Chocolate salami. Some of them I covered in caster sugar, others with milk chocolate. My mom loves these so much! I completely robbed her of her diet (sorry mom!).

Photobucket

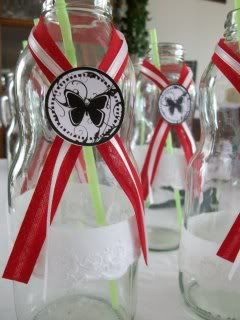
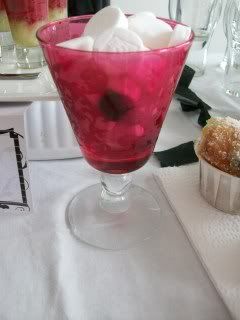
A close-up of the invitations which were used as the cups to pour juice in. My sisters decided to pour tea into these because it was way cooler than a normal teacup. And it could hold more. They had a point.

Photobucket

Now for a close-up of my lovely glasses (at a pretty odd angle). They are quite pretty aren’t they? I tried to make layers of candy in each glass, but this is totally not noticeable at all. Next time I’ll just go for one sort of candy each. That way flavours can’t mix either.

Photobucket

I made Blueberry Lemonade and bought two different juices with Cherry/Pear and Forest Berries flavour. I didn't have any good pictures of that though.
Now last, but not least two pictures of either side of the table so you can see what it looks like all together a little closer. I didn’t do bad right?

Photobucket

Photobucket

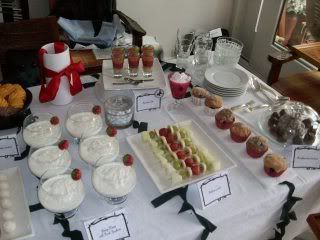
So there you have it! The sweet dessert table I made and I'm so totally proud of. I hope you enjoyed! Don’t forget to click on the links for the recipes!

Tuesday, September 6, 2011

Quick & easy: Super Simple Salad

When you don’t know what you want to eat for dinner except rice and you can’t be asked to actually cook a lot, this salad will be the perfect solution. At least, that’s what I thought. It adds something healthy to the rice (I thought this too) and it’s still done in no time. Not to forget delicious, of course.

Photobucket

Ingredients:
A cucumber
Cherry tomatoes (handful)
Soy sauce
Dried parsley
Salt & pepper


1. Cut the cucumber into thin slices (and then into four if it’s a very large cucumber). Slice the cherry tomato into four as well and throw everything in a bowl.
2. Sprinkle over a good deal of soy sauce and add salt & pepper to taste. Mix a bit again.
3. Sprinkle over some dried parsley for decoration and extra taste and done!

I told you it was easy! This would make a perfect quick side dish for any menu. And look at how fresh and colourful it looks. I’m telling you, you can’t go wrong! Having said that, I think I’ve said about everything there is to say. Did I mention it was quick and simple?
By the way, what do you think of my title? I’m getting more original every time don’t you think?

Sunday, August 28, 2011

Chocolate salami

Have you ever heard of the site www.foodgawker.com? I like to stare at it sometimes. It has a million pictures of people who cooked, baked or combined loads of different kinds of food. I was staring at it again for a while, which was when I stumbled on this recipe. I’d never heard of chocolate salami and it sounded really peculiar. Obviously you have to try it right?

Photobucket

Ingredients:
100 grams biscuit
55 grams (milk) chocolate
38 grams butter
40 grams sugar
1 small egg
powdered sugar


1. Crush the biscuits. Don’t leave them to big or to small, about one to a half fingertip will do.
2. Melt the chocolate and butter over a low fire. When melted take it off the fire.
3. Add the sugar to the chocolate and butter and mix it in.
4. Beat the egg slightly before mixing it in as well.
5. Use greaseproof paper or kitchen foil to roll the mixture into a cylinder. If you’ve ever made sushi, it goes exactly the same way except you’re using a chocolate-biscuit mixture in stead of rice and foil in stead of sushi nori.
6. Leave in the fridge until set. This will take about an hour.
7. Roll the chocolate salami out of the foil and cover it in powdered sugar so it doesn’t stick. And done! Cut into slices to serve.

Photobucket

I made one roll the day before yesterday and I cut it into slices to take pictures of it later, when I came back it was completely gone. I got compliments of the rest of the family that it was very delicious. So I was forced to make it again yesterday to be able to make pictures. Also my mom asked me if I could make more because she really liked it. Obviously I wanted to taste a bit more than just the edges I trimmed off myself too! Guess what happened next? My mom blamed the dogs for eating most of it and asked me to make another one. So I made the roll again today. There you have it! I made the same recipe three days in a row! It’s really easy and doesn’t take long either. You could easily change the recipe to your liking as well. Today I soaked raisins in rum for a while and added them to this recipe. You could also use white or dark chocolate in stead of milk. You can add different kinds of nuts, dried fruits or alcohol. You can even change the shape of the cylinder. I might use this recipe for the dessert table I’m making. I could easily turn make little balls instead and cover them in more chocolate and call them bonbons!

Tuesday, August 23, 2011

Doughnut muffins with blackberries

Photobucket

I felt like baking so I decided to make something from one of my cute books about muffins. After drooling over several delicious recipes I decided to make doughnut muffins, because it just sounded so delicious! I added the blackberries myself, because muffins without berries or chocolate aren’t really muffins. Here’s what I ended up with:

Ingredients:
275 grams self-raising flour
1/2 teaspoon bicarbonate of soda
50 + 100 + 50 grams caster sugar
75 ml sunflower oil
150 grams (Greek) yogurt
1/2 teaspoon vanilla extract
2 large eggs
2 handful blackberries


Photobucket

1. Wash the blueberries and drop them into the first 50 grams sugar until each blueberry is coated in sugar. Set them aside and leave them to dry.
2. Sift the flour, the bicarbonate of soda and 100 grams sugar together.
3. In a separate bowl add the oil, yoghurt, vanilla extract and eggs together and whisk.
4. Add the flour/sugar-mixture and mix until everything is thoroughly mixed. Try not to beat the batter any more than necessary as the muffins might be dry.
5. Line a cupcake tin with cupcake cups and drop a spoon in each case. Add a blackberry or two and add another spoon of batter. Repeat this until all blackberries are used and the cupcake wrappers are filled for about 3/4.
6. Preheat the oven to 190 degrees Celsius or 375 degrees Fahrenheit and leave the muffins in for about 16-20 minutes.
7. When the muffins are done and have cooled a bit, melt the butter in a small pan. Brush the muffins with the butter and dip them in the last 50 grams of sugar.

Photobucket

There you go! Covered in sugar like real doughnuts, taste like doughnut, but have lovely extra berries in them like muffins and in the shape of muffins: these are definitely going to be made again! I made a cake tin full of them (12 muffins) and even though we’re with only 5 people at home of which a few say they’re on a diet, they were gone in a day! I felt bad I was only able to eat three.

Photobucket

Photobucket

Sugar melon & peach juice

One of the things I learned in Greece was that I’m going to definitely need a juicer of my own one day. I think I stole the juicer there at least once every day and a lot of fruit to go with it! One of the things I tried out that went together surprisingly well was this recipe:

Photobucket

Ingredients:
1 slice sugar melon
2 peaches


1. Throw through the juicer, mix in some ice cubes and done!

To everyone’s surprise sugar melon goes very well through a juicer. We didn’t try the watermelon, because basically it’s all juice, but perhaps that turns out really nice as well. We did use a lot of peaches since we bought quite a lot and combined them with apples and in this case sugar melon. Another recipes you’re going to have to try if you have a juicer is this one:

Apple and Carrot juice
Ingredients:
2 apples
5 carrots


1. Throw in the juicer, mix some more ice cubes in and more juice for another day!

If you don't have any juicer, you can always throw these in a mixer. It will end you up with a thicker juice. If you're very much against then you can always put it through a sifter. I'm guessing it wont really work with apples and carrots as they don't contain a lot of juice. In the worst case you'll have to buy apple juice and carrot juice and mix them!

Blackberry bubble juice

Here’s a drink I just invented a few hours ago and I’m already going to put on my favourites list. I really dislike drinking anything with bubbles, but this one I like. It’s sweet exactly the way I like it, it tastes like berries with a hint of lemon and it’s totally mine!

Photobucket

Ingredients:
2 handful of blackberries (about 70 grams)
150 ml water
70-100 grams sugar
1/2 litre soda or sprite


1. Put the blackberries and the water in a pan and bring to boil. Squash the blackberries with a fork.
2. Add the sugar and stir until dissolved. Leave the mixture to broil for 5 minutes.
3. Leave the juice to cool. Don't worry about the juice being too sweet at this point.
4. Add the soda or sprite and done!

And there you go, a refreshing sweet drink for whenever you want (that being preferably the beginning of autumn when the berries grow)! It doesn't take up a lot of berries either, as we normally don’t get more than a hand or two off the bushes in our garden.
I reckon I can do this with any kind of berries, or even with jam heated up in some water and then with added soda. Imagine the possibilities! This is definitely a simple basic recipe that everyone should know about and perhaps everyone could think of themselves.

Cranberry twists

This is one of those recipes that I should’ve posted ages ago, but just haven’t got around to do yet. I tasted something from a supermarket called ‘cranberry twists’ and I really loved the way they tasted with cinnamon butter! So I decided I’d make some for myself. Since the bread looked dark, I decided on plain wholemeal bread, with dried cranberries in it. I’ve bought it a few times since, but they don’t always sell them, and when they do it’s not always like the first time I tasted it. They’ve made Cranberry twists with nuts, or just plain twists with nuts and at some point they skipped the sugar. So from now on, I’ll be sticking to my own recipe!

Photobucket

Ingredients:
1 cup water
375 grams (wholemeal) flour
1,5 teaspoon salt
1 tablespoon sugar + extra
2 tablespoons butter
1 teaspoon dried yeast
250 grams cranberries


1. Poor the water into the bread machine pan. Sift the flour over the water to cover it completely.
2. Add the salt, sugar and butter each in separate corners of the bread machine pan.
3. Make a little dent in the middle and add the dries yeast. Start the bread machine.
4. Add the cranberries after the first kneading cycle, or add them after the bread machine is done. When it is, take out the dough and push it back (add cranberries at this point if you haven’t already) and knead.
5. Cut the dough in 8 equal pieces and roll them out into long cylinders. Twist them a few times, lightly, so the twist is visible.
6. Warm some butter and brush it over the buns, then sprinkle sugar over it.
7. Preheat the oven to 200 degrees Celsius or 400 degrees Fahrenheit and leave the buns for about 30 minutes.

Photobucket

There you go! Leave them to cool at least a little bit and eat them! I’ve used this same recipe to make buns with nuts and raisins as well, but most of all cranberries. Cranberries are definitely my favourite kind of berries when dried. If they weren’t so expensive I would just eat a package every day!
The picture’s I made are from the second time I used this recipes and show tulips / 'dinofootprints' rather than twists. I think I like the twist shape better. There was a huge bouquet of flowers on the table I made the pictures on, so I used some as decoration. Aren’t they pretty?

Photobucket