Friday, November 27, 2009

Banana & chocolate jam

I'd so much rather call this jam compote, since it is rather thick. It's a recipe I found and I HAD TO try!! It just sounded so awkward! It tastes really good though. I find it really nice with sponge-cookies I made, or with yoghurt. It was pretty simple to make, so that made it fun as well. Long live the fun but delicious recipes!
I tried finding cute little jars to put the jam in, I liked these, but later on noticed that you cant put any fabric around them with a bow. For the granny feeling, you know? And again, I ended up finishing this recipe at night, and make pictures that night. Bad lighting! I just didnt know how to get these pictures right!

Photobucket

Ingredients:
300 gram bananas (without peel)
80 gram (dark) chocolate
100 ml water
210 gram caster sugar


1. Start with the bananas by slicing very thinly them or chopping them into small pieces and mashing them.
2. Put the water and caster sugar in a bowl and bring it to boil. Stir until all sugar is dissolved.
3. Add the bananas as well and keep stirring while bringing to boil. Make sure the mixture keeps bubbling, but do not let it burn! Keep this up for about 4 minutes, or until the mixture becomes clearer.
4. Chop the chocolate into smaller pieces (if they’re not already) and add them to the banana-mixture. Keep stirring until the chocolate is completely dissolved.
5. Remove from heat and pour it into glass jars. Close these immediately after you poured the jam in and turn them upside down. A trick I learned from my mom – this will help ‘suck’ the jars vacuum after which you can store them longer.
6. Turn them back when they’ve cooled down and store them in a cool spot. The jam will be a bit thicker when it’s cooled down. The jam, or compote, is also quite nice when you serve it warm with cookies or yoghurt!

Photobucket
If the banana-mixture looks like this, you're doing ok! (dont worry if it doesnt though)

Photobucket

Monday, November 16, 2009

Chocolate cupcakes with buttercream

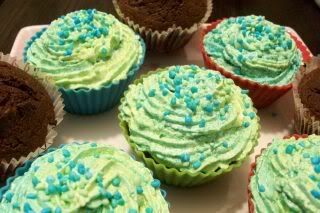
I should have called them DINOCUPCAKES!! Just because it's an awesome name, the sprinkles are called dinosaursprinkles and because the colours are kinda cool, but I thought this boring name would be more descriptive and thus better!

Photobucket

I would like to call these cupcakes low budget, "Ive got nothing in the house for something complicated" and easy. I think I'm actually right! Barely any ingredients are needed, then again, they're just cupcakes. And in a few steps you've got yourself some lovely chocolate mixture, which is yummy to eat by itself but you still have to bake it.
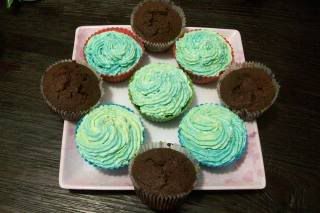
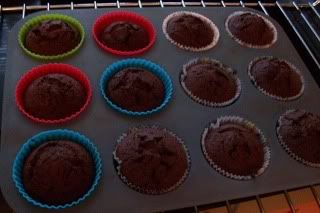
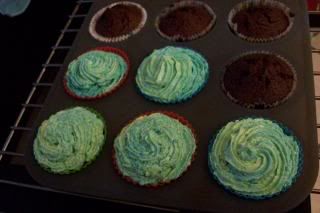
I really love these simple things from time to time. Not having to spend much time and thought on a recipe and still creating something delicious. It's wonderful! At some point I bought silicone baking cups and they give the cupcakes such a colourful effect!

Photobucket

Photobucket

Ingredients:
8 tablespoons (unsalted) butter, softened
115 gram caster sugar
2 eggs
85 gram self-rising flour
25 gram cacao


1. Mix the butter and the sugar with an electric mixer until light and creamy.
2. Beat the eggs lightly and add this two the butter-mixture in several (3-5) additions. As long as it's not in one go it'll be fine!
3. Sift the flour and cacao, adding a bit each time to the butter-mixture and mixing well between each addition.
4. Spoon the mixture into baking cups and put them in a preheated oven of 175 degrees Celius or 350 degrees Fahrenheit and leave them for about 15-20 minutes. If the cakes look dry and risen and a pin comes out dry, they're done as well.

For the photo's, apart from the basic - with very bad lighting - I tried doing some refreshing angles. I think some pictures turned out pretty cool!!

Photobucket

Photobucket

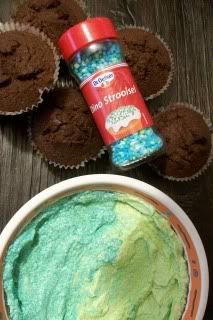
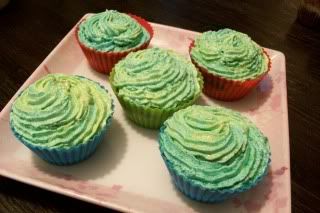
You might've been wondering how to make such a deliciously looking creme as well! Cupcakes alone are awesome, but the decorations just make it a real treat! The buttercream is also fairly easy to make.. It also stays good for quite a long while! It doesnt 'melt' like whipped cream does, but stays in the same shape for a long while and it doesn't loose any of it's taste!

Ingredients:
5 eggs
175 gram sugar
250 gram butter
vanilla essence (or any other food flavouring or -colouring)


1. Beat the eggs with an electric mixer until very stiff. About 1-2 minutes.
2. Add a few spoons of sugar and mix again. Add the sugar in multiple additions and mix well in between every addition, or gradually add the sugar while mixing.
3. Double-boil the mixture and mix again every once in a while, until the mixture is thick and creamy. (I left this out on my first try and while it went fine, I wouldn't recommend it!)
4. In a separate bowl mix the butter until thick and creamy. Then add the vanilla essence, or anything else you've chosen, and mix this in well.
5. Add the egg-mixture to the butter in a few additions, starting with a few spoons, and mix this in well. When everything is fully mixed, you have your own colourful buttercream!

I coloured my buttercream in the colours my sprinkles were, to give it a better effect. Although everyone initially thought they were awkward colours. The buttercream was gone in no time! Some of it never reached the cakes!

Photobucket

Photobucket

Thursday, November 5, 2009

Mini meringue cupcakes

Photobucket

I changed my blog title/picture some time ago, and never actually bothered to post the recipe for cute little cupcakes on it! It was one of my experimental recipes. Every single colour is a different taste and with every taste I also experimented in adding something. In the end, every colour and every colour baking cup is a different taste! I added cranberries, sprinkles, banana flavour, vanilla flavour, nougatine and coconut and what ever I could find to all the different meringues! The idea for the meringues came from the coconut delight I made. Later on I decided I could also make lollipops of them and so I put them on sticks. Then I thought dipping these in chocolate would be way more fun and so I did! Also decorating some of the meringue cupcakes with chocolate. It was really fun to experiment with all of this!

Photobucket

Photobucket

Photobucket

Ingredients:
3 eggwhites
210 gram confectioners/powdered sugar
Experimental needs (food colourings, flavouring, sprinkles, coconut, cranberries etc.)
Chocolate


1. Mix the eggwhites very stiff with an electric mixer. Add the confecionars sugar spoon by spoon and mix well after each addition. Both of these take a while! Make sure to not add the confectioners sugar all in one go! The egg whites will collapse under the weight and the recipe just won't work anymore.
2. Add everything you want to the egg&sugar-mixture now! From colourings to flavours to sprinkles, be creative!

Photobucket

Photobucket

3. Preheat the oven to 150 degrees Celsius or 300 degrees Fahrenheit. In the meanwhile line mini baking cups on an oventray and use a spoon to fill them with the creative mixture. For lollipops line the oven tray with a baking sheet and use a spoon to make little circles.
4. Bake the meringues for 15-20 minutes and done!! Double-boil the chocolate if you want some decoration or for the lollipops. Put the meringues for the lollipops on sticks and and dip them in the melted chocolate. Tap a few times to the side of the pan to get the unneeded chocolate off and leave them somewhere to dry. I stuck the sticks into an egg-box for this! Put sprinkles on them before they're dry and in no time: done! You have your own lollipop-meringue and cupcake-meringue set!

Photobucket

Photobucket

Photobucket

Photobucket

Photobucket

Ah, some pictures for inspiration :) I like making pictures! Even though they're not the best!