Friday, August 12, 2011

Quiche

I didn’t actually have a recipe for this, but I decided to cook and I thought a quiche would be nice and easy. The way I thought I could make one, was very easy. The quiche I made was a vegetarian one, or one with just vegetables, because I didn’t like the idea of putting any meat in at that moment. I’m not sure if I’m the only one on this, but sometimes I just don’t want to eat meat! So here's a recipe for a quiche, that is completely non-official and might not be anything like how people make quiches, but it's my own recipe!

Photobucket

Ingredients:
7 sheets of puff pastry (or enough to cover a cake tin)
1 cheese sauce
Vegetables like mushrooms, leek, (spring) unions, spinach, bell peppers, tomatoes,
1/2 cup or 75 gram cheese
Salt & pepper


1. Line a cake tin with puff pastry.
2. Cook the vegetables with a bit of oil in a large pan. When cooked, drain the oil and any liquids out.
3. Fill the cake tin with puff pastry with the vegetables. Cover the vegetables in a layer of cheese. Add salt and pepper if preferred.
4. Poor the cheese sauce over the vegetables and cover the cheese sauce with another layer of cheese. Decorate with parsley and basil.
5. Preheat the oven to 180 degrees Celsius or 360 degrees Fahrenheit and leave in the oven until the top cheese layer turns golden brown and the puff pastry ‘puffs’. This should take about 20-30 minutes.

Photobucket

Note on the cheese: just like with the sauce a matured cheese is preferred above younger cheeses. If you use a younger cheese you will barely taste any cheese at all, so stronger cheeses like parmesan or cheddar are preferred.
Note on the sauce: make sure it is thick enough! My sauce ended up a slight bit runny so when I cut the quiche it started dripping rather than staying exactly in place. If you are using the recipe for cheese sauce I posted then make sure to use more flour and cheese and add less milk!
Other notes: If you’d like to add some meat to it I’d suggest ham, bacon or minced meat. You can cook these as well beforehand and then add them chopped and mixed through the vegetables or as a separate layer.
All in all, I didn't do so bad right? Except from needing loads and loads more cheese, it was awesome! I'm proud of me! Enjoy!

Photobucket

Sauce of million uses

Here’s a sauce after a recipe from my mom, which she referred to as roux sauce. My mom makes a lot of lovely sauces on a whole scale of different meals and she finally told me her secret! I needed the sauce for a Quiche I decided to make. I thought I knew enough about quiches so I could make one without a recipe. Click on the link if you want to see how I did it! It was really very easy, this sauce might’ve been the hardest thing about it and you’ll notice it’s laughably easy once you start.

Photobucket
Here's the cheese version of this sauce used in a quiche!

Ingredients:
2 tablespoons butter
4 tablespoons flour
1-2 cups milk


1. Melt the butter in a pan and add the flour spoon by spoon to make a thick mixture. In the meanwhile warm the milk in a separate pan.
2. Add the milk little by little until you have a thick but runny sauce.
3. For a cheese sauce add: 75 gram (1/2 cup) grated cheese and stir in.

Note on the cheese: matured cheese is preferred above younger cheeses. Personally I’m really not a fan of matured cheese, but if you use a younger cheese in this recipe you will barely taste any cheese at all or end up using a lot more cheese. The stronger parmesan cheese is a really nice option for this recipe.
I used this sauce for a cheese sauce so far, but you can add anything you like. Think of different herbs and spices, peppers, cheeses. The milk in the recipe is easily replaced with cream for an –obviously- creamier effect. Suggestions I found on internet to use in the sauce are curry powder, dill, nutmeg, cheese, and not to forget: salt & pepper. I’ve even seen a recipe that asks you to leave unions and cloves in the milk for an hour beforehand and then use it. None of them really sound bad actually!

Monday, August 8, 2011

100 posts!

100 posts! I can barely believe it! That means I’ve posted at least one hundred recipes since I first started! Which also means I’ve become slightly addicted to it in the meanwhile. Also, I’ve gotten a lot better at cooking! Not to mention I’ve gotten better at posting and taking pictures or blogging in general.
I’ve thought of making this post a special one, like baking myself a happy birthday pie, but I decided against it. Especially since I’m going to be real busy soon with a dessert table I’ve been planning on. Also I currently lack motivation and inspiration for something totally awesome. So I decided it would be nice to show you what’s behind the food you see in the posts. Like the recipes for instance: anyone interested in the books I own? I believe I’ve said I’d post something about it before.

Photobucket

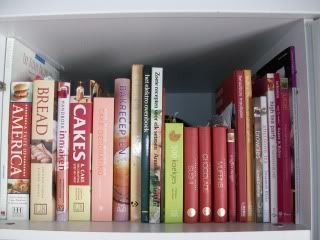
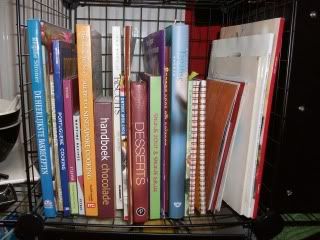
Let’s start with my bunch of books! I have my books spread out over two shelves and they’re both stacked pretty full. Not to mention the books I have down stairs and all the other cookbooks that belong to my mom (she might own 3 shelves full). It's funny how you can definitely notice my precious book shelf and my dont-really-care-as-long-as-they're-there shelf. I picked some of my favourites to show you: (left to right, starting at the top)

Photobucket

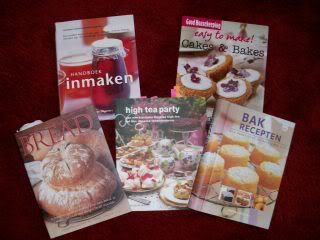
Handboek Inmaken – Catherine Atkinson & Maggie Mayhew
It’s a book about jams, jellies, relishes, chutneys, pickles and every other way to store fruits and vegetables. I mentioned it before in a post about lemon jam. I haven’t actually used a lot of the recipes from this book, but I just love the looks, layout and explanations given in this book.
Cakes & Bakes – Good Housekeeping
This is a book with a bit of everything: a few cakes, a few cupcakes and a few cookies. Since this books is English it sometimes calls for a lot of ingredients like maple syrup and bicarbonate of soda, which are a lot harder for me to get here. I love this book mainly because I got it from a dear friend. Recipes like the chocolate mousse bombes and carrot cake came from here!
Bread – Christine Ingram & Jennie Shapter
This is a wonderful must-have book for everyone that enjoys baking breads or buns (and even cakes!). It starts with a whole section of breads around the world with a short explanation on every bread. Then it has a section for breads baked by hand and another section for the bread machine. It ends with cakes that you can make with your bread machine. Apart from just recipes this book also describes a whole lot of utensils, ingredients and their effect when used, what problems might arise and how to fix them and –very handy- how to convert bread machine recipes to recipes by hand and the other way around. I seriously never want to do without this one anymore. Recipes I used from this book include Yoghurt bread and Mocha Panettone (including about all my other breads really).
High tea party – Susannah Blake
I believe this is one of the first real baking books I bought. This book is also one of the most lovely books I have. It describes a few themed tea parties and all the recipes you could use that are tuned to that theme. The pictures are of the kind that would make anyone drool and jealous (I wish I had those skills, I wish I had those teacups, I wish I had that food!!!). This book inspired me to do a lot more baking and ended me with a love for tea parties. The post Little lunch is inspired by this book.
Bak recepten – Veltman
This book is another everything-in-one book, but this book has a lot more of everything. It has sections for cakes, pies, muffins, cupcakes, cookies, tray bakes, desserts, bread and scones. On top of that it has a list of problems and instructions at the start of every section. So a perfectly fine book!

Photobucket

I’d also post something about all the kitchen utensils I own. I don’t believe I have a lot, although probably more than the average household and probably quite a lot for someone my age, but I believe I need about all of them. I mean, no one can do without a mixer right? How about knives, spoons and baking trays? See? I NEED each and every one of them. Maybe take out a few cutters and stencils, but still. How about I post something about that around 200 posts, maybe 150? Or what about posting something about the history of the blog? The blog has changed a lot since I first made it! Anyway, let’s focus on all the recipes I need to catch up with for now again.

Sweet black rice with bananas

I bought glutinous black rice a while back because I wanted to try it out, but I never actually looked into how it was made. So the first time I made black rice it turned out as a bit of a failure: some of the grains were still hard and it just didn’t taste right. This time I decided to look up how exactly one prepares black rice. That’s when google becomes your friend and you just type ‘prepare black rice’ and click the first link. It worked! I came up with this site which basically said you had to leave it in water overnight (as usual with glutinous rice) and just cook it. I could’ve thought of that. Then it mentioned cooking it with coconut milk, bananas and pineapple. I hate pineapple really so we scratched that. I had coconut cream laying around and enough bananas to last a lifetime, so there we had a new recipe to add to my blog!

Photobucket

Ingredients:
1 cup of black rice
2 cups water
2 cups coconut milk or cream
4 tablespoons sugar
1 tablespoon butter
3 banana’s


1. Leave the rice in a bowl of water overnight. If you realise you’re a bit late you can still soak it in water till up to about 3 hours beforehand.
2. Bring the rice with the water, coconut milk and sugar to boil and then leave to simmer about 20 minutes.
3. In the meanwhile bake the bananas in butter – or turn them into a warm banana mush.
4. When the rice is cooked (it shouldn’t be tough) mix in the banana’s and serve!

To my and my families surprise it tasted lovely! It was more a dessert than a side dish and it tasted better warm than cold. I’m definitely going to make this recipe again and again and again. If I remember to make it on time, it’s really not hard either.
The black rice I used was a dark kind of purple, towards black (hence the name I’m guessing). It gave the water a lovely colour and I’m thinking of bathing Easter eggs in it at some point. I’m pretty sure you’ll end up with nicely coloured eggs.
I didn't have time to make any pictures, but I managed a quick shot! I hope you enjoy making and eating this recipe! Do try it!


Note: I'm on 99 posts! I feel like I have to post something special next now!