It’s just a question that popped up in my mind and I wondered what it would be like to make it myself. I was immediately made to look up recipes and do research to find out how it was actually made. It ended up being surprisingly deadly simple. So simple even, that I was done in no time as well.
I used the standard whipping cream you can buy here, but I’m aware that in countries as England and America you have heavy, half or double cream and who knows how many more kinds?! So I thought I’d mention that the cream I used had 35% fat.
Also for the storing, since it's real butter, it will get rockhard when you leave it in the fridge for a while. So it's best stored somewhere out of the fridge, or taken out of the fridge an hour or so before use.
Ingredients:
Whipping cream (250 ml)
Water (6 x 200-400 ml)
1. Put the whipping cream in an kitchen machine or beat it with an electric mixer. If you think you are really good you can also put it in a jar and shake. The whipping cream will start out liquid, go to foamy, then to whipped cream, then it will start looking like thick, clotted cream and eventually you will start getting butter.
2. Besides the butter you will have buttermilk, which you need to poor out into a cup at this point.
3. Add water (I used about 200-400 ml a time) and mix again. This way you will ‘wash’ the butter. Keep adding water and draining it again until the water comes off clear.
4. Beat a few times without adding water, or mix it with a spoon, while trying to get the last water out and drain that.
5. Add salt if you want salted butter!
And there you go! You’ve actually made butter. I thought it looked a bit lighter than normal butter. It tastes really creamy and lovely! The buttermilk you have left in step 2 tasted just like whole milk to me. I drank a bit that day, but the next day or the day after it had already fallen apart into two layers. So you can’t keep this for long, but it’s really nice to drink right after making butter anyway. It's a nice surprise to know that besides butter you can actually now also make milk!
The reason we’re washing the butter in step 3 is to ensure the butter lasts longer. In the end my butter lasted about a week or two, then the last bit that was left started tasting like cheese. If you’re sure you’ll only need the butter for that day (because maybe you planned on a breakfast for the whole family with home-made butter) then you can skip step 3.
I was pretty proud I actually made butter even though it’s such an easy process. I definitely plan on doing this more often. Perhaps on the next high tea or lunch I want to organise I can use it? Also, I should try finding a farmer around here that can provide me real milk, fresh from the cow. Apparently that tastes even better than using whipping cream...!
Note: I took no pictures of this, but you all know what butter looks like right?

Saturday, June 18, 2011
Friday, June 17, 2011
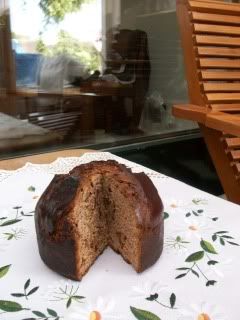
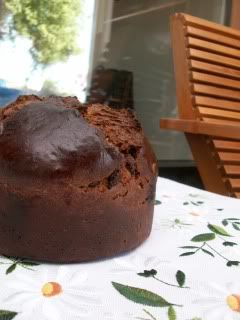
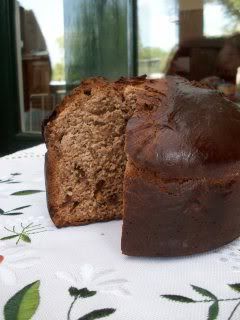
Mocha Panettone
Panettone is a traditional Italian Christmasbread. Now I know it’s nowhere near christmas and I’m not Italian either. But then you see a recipe called “Mocha Panettone” and it look like an overly delicious chocolate bread, then you have to try it right?
Ingredients:
2 tablespoons instant coffee powder
140 ml milk
1 egg and 2 egg yolks
400 grams white bread flour
1 tablespoon cocoa powder
1 teaspoon cinnamon
1/2 teaspoon salt
6 tablespoons caster sugar
75 grams butter
1 1/2 teaspoon dried yeast
115 grams chocolate
3 tablespoons pine nuts
1. Mix the coffee powder with 2 spoons boiling water. Leave to cool and poor into the bottom of the bread machine pan. Add the milk and eggs as well.
2. Sift the flour, cocoa powder and cinnamon together and in the bread pan ensuring it covers all the water.
3. Put the salt, sugar and butter each in a different corner of the pan and add the yeast in a little well in the middle.
4. Turn on the bread machine and put it on the kneading cycle.
5. When the cycle has finished remove the dough from the machine and knock it back. Knead the chocolate and pine nuts into the dough.
6. Shape the dough into a ball and put it in greased cake tin or soufflé dish. Cover it with cling film and leave it for 45 to 60 minutes to rise.
7. Preheat the oven to 200 degrees Celsius or 400 degrees Fahrenheit. Cut an X on the top of your bread and leave it in the oven for 10 minutes.
8. Reduce the heat to 180 degrees Celsius or 350 degrees Fahrenheit and leave the bread in for another 30 minutes.
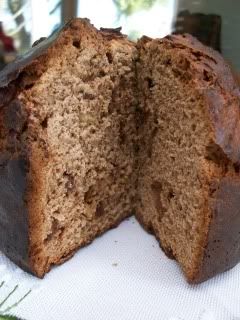
The bread was a bit dry so I figured I might not have used enough butter, or perhaps I didn’t let it rise long enough. Still, it was a proper chocolate bread and it was gone within a few days. I’m not sure who ate it, but it wasn’t me! It goes very well with home-made butter. I didn’t have any pictures of that, but I should make sure to make a post about butter. It’s easier than you think. It’s even easier than putting a bread in the breadmachine!


Carrot cake

I thought of a few things to write down here, but I figured there is not much to say. This is a recipe on carrot cake, probably the most divine cake we have on this earth. Enough said!
Ingredients:
100 grams (unsalted) butter
150 grams (grated) carrots
100 grams raisins/sultanas
100 grams dried dates
50 grams grated coconut
1 teaspoon cinnamon
1/2 teaspoon nutmeg
330 grams maple syrup
150 ml apple juice
grated zest and juice of 2 oranges
225 grams self-raising flour
2 teaspoons bicarbonate of soda
100 grams walnuts
1. If you haven’t bought grated carrots, start grating them! Grate the two oranges while you’re at it and get the juice out with a juicer (or squeeze). Don’t forget to chop the dates and walnuts as well.
2. Put the butter, carrots, dates, raisins, coconut, cinnamon, nutmeg, maple syrup and apple juice in a pan. Bring the mixture to boil and leave to cook for a few minutes. Then leave to cool.
3. Sift the flour and soda together in a bowl and add the chopped walnuts.
4. When the carrot-mixture has cooled down, mix it in with the flour and put the batter into a battered cake tin.
5. Preheat the oven to 190 degrees Celsius or 375 degrees Fahrenheit. Bake the cake for about 30-45 minutes until a skewer comes out dry.

The carrot-mixture in step two is seriously nice! I thought it smelled like Christmas and it totally made me want to eat it just like that. I’m glad I waited though, because the cake was delicious when it was done as well, if not even more. Unfortunately I forgot the ingredients for the icing. But I’d use something like orange or lemon, cream cheese and icing sugar for that, I will do next time I make this!
Tuesday, June 14, 2011
Portuguese cooking night
I made a random post about Pizza waffles and haven’t even said a word about my Portuguese cooking night like I intended. So I’ll be doing that now! Please forgive me the pictures as usual, but here's what I made: Batatas de Rebolão (apparently translates to: pan roasted potatoes), Bifes de Cebolada (Braised beef and union), Peixinhos da Horta (fried string beans) and Ovos verdes (egg and parsley croquettes). The last one especially caught my eyes since I've never actually had frittered eggs and it sounds kind of odd, which means we totally have to try it out. The rest was more or less randomly picked from the dishes in the book ‘Portuguese cooking’ brought by my parents all the way from the Azores.
I’ve order the recipes to what will take the longest and you should start first with to what’s better off last. Enjoy!
Bifes de Cebolada (Braised beef and union)
Ingredients:
2-3 (cooking) tomatoes
2-3 unions
3 cloves of garlic
4 slices beef or steak
Parsley
Salt & pepper
Oil
1. Wash the tomatoes and cut them into slices after you’ve removed the seeds. Peel and slice the onions as well.
2. Use a casserole and cover the bottom with sliced tomato and unions. Lay a slice of beef or steak on top with salt and pepper. Cover this with garlic (sliced or chopped), parsley and drizzle oil over it.
3. Repeat with another layer of tomatoes, unions, then more beef, salt&pepper, garlic, parsley and oil until all beef is used.
4. Preheat the oven to 200-250 degrees Celsius or 400-480 degrees Fahrenheit. Put the lid on the casserole and leave for 45 minutes to an hour. If the beef doesn’t seem to be cooking or runs dry, you can add water.
Forgive me the inaccuracy of the heat of the oven and the cooking time, but the recipe said ‘cook’ and nothing more than that, which completely confused me. The recipe wanted me to use an earthenware casserole, so I guessed that I was going to the oven. My mom helped me a bit on the timing and the heat and I think it took about an hour before it was done, at least way more than the 30 minutes it said was needed. Also, after a while my mom suggested I’d poor some water in, since apart from the bit of oil I used, the beef was completely dry. It’s not something I’d try again, except perhaps with chicken since it cooks faster, and a lot more seasoning.
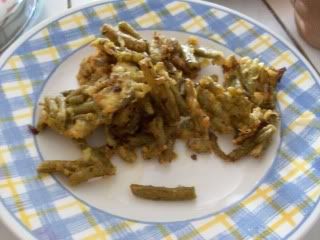
Peixinhos da Horta (fried string beans)
Ingredients:
1 can beans
100 grams flour
1 egg
1/2 union
Salt
Water (about a glass)
Frying oil
1. Take the beans from the can and drain out the water.
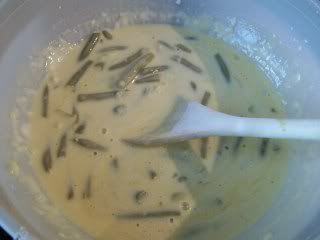
2. In a bowl mix together the flour, the egg (slightly beaten) and half the onion (chopped in pieces). Add a bit of salt. Then add enough water to get a smooth batter (like that of pancakes for example).
3. Add the beans and leave for about 30 minutes. (This is the perfect time to start the next recipe or any other dish you wanted!)
4. Heat the frying oil in a pan and add the beans a few at a time. Use a spoon with wholes to drain out the excess of batter. Fry the beans until the batter around it becomes golden brown then remove and repeat until all the beans are used.
My sister was especially fond of this recipe and kept asking for more. I noticed these beans aren’t bad at all even when they’re cold and don’t actually need any sauce or so over it. I was too lazy to do this bean by bean, so we had clumps of beans instead. Trying to fry every single bean seems way too time-consuming too me, and very messy.
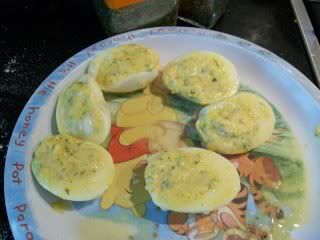
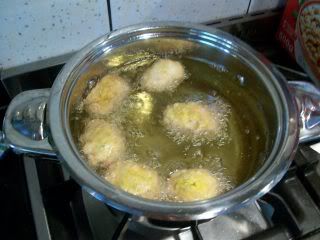
Ovos verdes (egg and parsley croquettes)
Ingredients:
9 eggs
30 grams butter
Parsley
Salt & pepper
30 grams flour
Frying oil
1. Cook 8 eggs. When done leave them to cool slightly or put them under cold water. Peel them and cut in half.
2. Take out the egg yolks and mix it with the butter, salt&pepper and parsley. Put the mixture back into the eggs.
3. Take out two bowls and fill one with the last egg (slightly beaten) and fill the other with flour. At this point, or even before, start heating the frying oil.
4. Take a refilled egg and roll it in the flour until completely covered. Then roll in the beaten egg until completely covered. After that put it aside, or put it into the frying oil immediately.
5. Keep repeating this until all the eggs are fried.
This whole process reminded me of making schnitzel. It’s really easy it just takes a lil' and it gets your hands dirty. You can start cooking the eggs way beforehand. It tasted really nice as well. Perfect as a sidedish!

Now last but not least (nothing comes least when it comes to food, ever, almost):
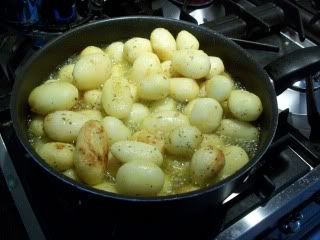
Batatas de Rebolão (pan roasted potatoes)
Ingredients:
Potatoes (I used a kilo)
4 cloves of garlic
Parsley
Salt & pepper
Olive oil
1. Put everything but the potatoes in a pan and put it over the heat.
2. Add the potatoes and fry them until golden brown.
These are just simple fried potatoes, but there’s never anything wrong with potatoes, especially when theyre fried and seasoned properly.
That was it for my Portuguese cooking night! Enjoy!
I’ve order the recipes to what will take the longest and you should start first with to what’s better off last. Enjoy!

Bifes de Cebolada (Braised beef and union)
Ingredients:
2-3 (cooking) tomatoes
2-3 unions
3 cloves of garlic
4 slices beef or steak
Parsley
Salt & pepper
Oil
1. Wash the tomatoes and cut them into slices after you’ve removed the seeds. Peel and slice the onions as well.
2. Use a casserole and cover the bottom with sliced tomato and unions. Lay a slice of beef or steak on top with salt and pepper. Cover this with garlic (sliced or chopped), parsley and drizzle oil over it.
3. Repeat with another layer of tomatoes, unions, then more beef, salt&pepper, garlic, parsley and oil until all beef is used.
4. Preheat the oven to 200-250 degrees Celsius or 400-480 degrees Fahrenheit. Put the lid on the casserole and leave for 45 minutes to an hour. If the beef doesn’t seem to be cooking or runs dry, you can add water.
Forgive me the inaccuracy of the heat of the oven and the cooking time, but the recipe said ‘cook’ and nothing more than that, which completely confused me. The recipe wanted me to use an earthenware casserole, so I guessed that I was going to the oven. My mom helped me a bit on the timing and the heat and I think it took about an hour before it was done, at least way more than the 30 minutes it said was needed. Also, after a while my mom suggested I’d poor some water in, since apart from the bit of oil I used, the beef was completely dry. It’s not something I’d try again, except perhaps with chicken since it cooks faster, and a lot more seasoning.

Peixinhos da Horta (fried string beans)
Ingredients:
1 can beans
100 grams flour
1 egg
1/2 union
Salt
Water (about a glass)
Frying oil
1. Take the beans from the can and drain out the water.
2. In a bowl mix together the flour, the egg (slightly beaten) and half the onion (chopped in pieces). Add a bit of salt. Then add enough water to get a smooth batter (like that of pancakes for example).
3. Add the beans and leave for about 30 minutes. (This is the perfect time to start the next recipe or any other dish you wanted!)
4. Heat the frying oil in a pan and add the beans a few at a time. Use a spoon with wholes to drain out the excess of batter. Fry the beans until the batter around it becomes golden brown then remove and repeat until all the beans are used.
My sister was especially fond of this recipe and kept asking for more. I noticed these beans aren’t bad at all even when they’re cold and don’t actually need any sauce or so over it. I was too lazy to do this bean by bean, so we had clumps of beans instead. Trying to fry every single bean seems way too time-consuming too me, and very messy.


Ovos verdes (egg and parsley croquettes)
Ingredients:
9 eggs
30 grams butter
Parsley
Salt & pepper
30 grams flour
Frying oil
1. Cook 8 eggs. When done leave them to cool slightly or put them under cold water. Peel them and cut in half.
2. Take out the egg yolks and mix it with the butter, salt&pepper and parsley. Put the mixture back into the eggs.
3. Take out two bowls and fill one with the last egg (slightly beaten) and fill the other with flour. At this point, or even before, start heating the frying oil.
4. Take a refilled egg and roll it in the flour until completely covered. Then roll in the beaten egg until completely covered. After that put it aside, or put it into the frying oil immediately.
5. Keep repeating this until all the eggs are fried.
This whole process reminded me of making schnitzel. It’s really easy it just takes a lil' and it gets your hands dirty. You can start cooking the eggs way beforehand. It tasted really nice as well. Perfect as a sidedish!


Now last but not least (nothing comes least when it comes to food, ever, almost):
Batatas de Rebolão (pan roasted potatoes)
Ingredients:
Potatoes (I used a kilo)
4 cloves of garlic
Parsley
Salt & pepper
Olive oil
1. Put everything but the potatoes in a pan and put it over the heat.
2. Add the potatoes and fry them until golden brown.
These are just simple fried potatoes, but there’s never anything wrong with potatoes, especially when theyre fried and seasoned properly.
That was it for my Portuguese cooking night! Enjoy!

Monday, June 13, 2011
Pizza waffles
I realised my recipe sidebar is getting awfully long, so I’m thinking of changing my blog around a bit again. I wanted a new title-picture for a while now, just be, you know, new. Plus if I’m very honest the blue and purple text doesn’t really match the rest of the blog now does it? So at some point I’ll have to be working on that again and on making a proper index, which would be a very nice thing to have as well. But for now: a new recipe!

My sweet sister bought me a book about cupcakes, but unfortunately I already had it. So we went out together to get something different. It was pretty hard to find a book on cooking or baking that I wanted. All the books there were kind of basic: about chocolate, cakes, cupcakes, muffins, French cooking, Italian cooking etc.. Admittedly I have least one of each, but there was one little book that I didn’t have yet: a book about waffles. I didn’t have anything like it yet, and come to think of it, I don’t know about you, but we grow up with waffles here! It’s kind of a disgrace to have cooking books about Italian, Portuguese, French, Singaporean, Japanese etc. cooking and not have one about something that I consider Dutch (regardless of whether it is really Dutch – I don’t know)!
But since I already know how to make normal waffles, I decided to go with something non-sweet and different. Pizza waffles! They really taste as good as they sound. It’s like making pizza yourself only waffles batter is al lot easier to make and get right than pizza dough. Putting your own vegetables and cheese on is really fun too, which makes them perfect for parties, kids or when you’re with a lot of friends.
There’s a few things I should do differently next time though, like add WAY more cheese and then I’m not talking about just double but maybe four times the amount I used. Also, I should spice the waffles up more. I think it’s since I didn’t use any tomato sauce, or because I didn’t use much seasoning in and on the waffles in the first place that they tasted a bit plain sometimes. I could try cooking toppings like mushrooms beforehand to shorten the time in the oven. And as always, I have to start earlier. We might’ve ended up eating around 7 o'clock or so. For people who normally eat between 5 and 6 that’s a bit late that is!
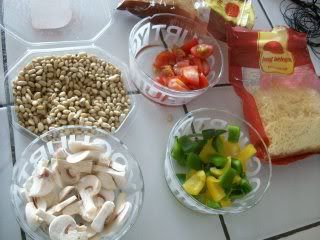
Ingredients:
1 package dried yeast (7 grams)
1 teaspoon sugar
0,1 litre + 0,25 litre lukewarm water
300 grams flour
2 eggs
75 ml olive oil
1 teaspoon dried oregano
1 teaspoon dried parsley
Salt & pepper
Toppings like: pine nuts, (cherry) tomatoes, mushrooms, paprika, garlic, ham, bacon, salami, pineapple
Cheese (loads of it and grated!)
1. Mix the yeast, sugar and 0,1 litre lukewarm water in a measuring cup of at least 1 litre. Make sure the water is not too hot! Leave this for 15 minutes in a warm place.
2. Sift the flour into a bowl. Add the yeast-mixture, the eggs, the oil and the remaining 0,25 litre water to the flour and mix.
3. Add the dried herbs, salt and pepper as well and mix again. At this point you can mix in any other dried seasoning.
4. Leave the mixture in a warm place for another 30 minutes.
5. Warm the waffle iron up and use butter or oil to grease it. If you don’t have any you can use a pan and make pancakes.
6. With a soup spoon add the batter spoon by spoon and make waffle after waffle until you’ve used all the batter up.
7. Line the waffles on a baking sheet in an oven tray and start adding whatever topping you like with loads of cheese (not liking cheese is not an option as you can see).
8. Preheat the oven to 180 degrees Celsius or 350 degrees Fahrenheit and bake the waffles for about 10 minutes until the cheese has melted.

Although the recipe is really easy, it might still take a while with all the waiting times for the yeast. I’m not even quite sure why yeast is used in this recipe, but perhaps all the other options will make it end up to dry or too sweet.
One of the things I love about this recipe is that it leaves you with endless variations. For instance, you could chop pine nuts, sun-dried tomatoes and olives and add them in step 5, which definitely will give the waffles more taste. Also you can endlessly variate the topping, starting with fish or meat (which might need to be prepared beforehand) to a whole series of vegetables, fruits, nuts, cheeses and whatnot. I’m currently thinking of giving the waffles a lot more taste by using more herbs, sun-dried tomatoes and pine nuts in the batter (added at step 5) and then for the topping using just a bit of salt, pepper and mozzarella. Then add a bit of basil on top of it. Sounds perfect doesn’t it?


Thursday, June 2, 2011
Pressed sushi
Last but not least: pressed sushi! This is actually way faster and perhaps easier than normal rolled sushi, but I think rolled sushi is easier somewhere since I've done it more often and it has more charm. Pressed sushi is way better for mass production though! I made a really simple type this time with salmon. But you could use this recipe with anything. It might be a lot easier to be creative with than real sushi.
Ingredients:
Rice
Nori leaves
Salmon
1. Line a brownie pan (or any pan that has a size you like and is deep enough) with cling foil.
2. Make a layer of nori leaves on the bottom and add a layer of rice on top. Press the rice down and even it out (it might be handy to make your hands wet as to not make the rice stick to them).
3. Add a layer of salmon and then repeat the layers of nori, rice and more salmon. Finish with a layer of nori.
4. Take the sushi out (turning it upside down helps) and cut into small pieces.
Tadaa! We could mass-produce loads of sushi like this! The trick is not to leave it for too long but to immediately cut it into pieces. If you leave it for too long to cut it later the nori leaves will have gone soft and it will be a pain to cut!
Well, that was the last one of my recipes for my Japanese cooking night. I've made sushi, yakitori, beans with sesame sauce and spinach with sesame sauce now. Next up will be my Portugese cooking night!
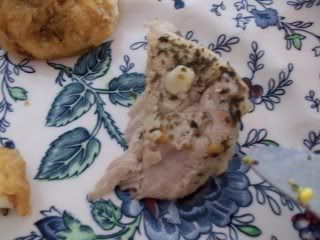
Yakitori
Next up is the overly delicious chicken I made! The recipe I found was actually quite complicated and I think I skipped about 80% of the steps so perhaps these aren’t real yakitori anymore, but they were delicious so I don’t mind what we call them! I remember I made a whole bunch of them and piled them up on a plate. Since both my sisters weren’t there it was just me and my parents eating them. My mom especially loved them and we ended up not leaving just one or two for my sister who would come later. It’s nice when you know something turned out delicious!
Ingrediënts:
3 chicken fillets
5-7 spring unions
5-10 spoons Soy sauce
Half a jar sweet soy wok sauce
1 spoon sake
1 spoon sugar
2-4 spoons broth
1. Chop the spring unions into pieces about as broad as you want the chicken to be (about twice a fingertips length? I don't know how to explain it).
2. Cut the chicken fillets into small pieces.
3. Skewer the chicken fillet and spring unions on bamboo sticks alternatively.
4. Make the sauce by joining the remaining ingredients and mixing it.
5. Dip the skewers into the sauce and line them up on a grill pan. Poor the remaining sauce over the skewers. Grill at high to medium heat. Make sure to turn the skewers every so often. Done!
I wonder if with all the broth I’m using is it noticeable that my mom just made chicken soup I was stealing? Anyway, the chicken was SO delicious and looked just like on the picture! It was a bit of a pain to wash the pan after though, but it was worth it! I feel somewhat bad for using all these ingredients that are going to be a pain to find again and not really remembering the amounts, but you got the main idea and you could use anything with this really. The original recipe asks mirin, sake, shoyu and kuzu, of which I only used the sake and tried to limit that as I completely hate the taste of it. Shoyu, apparently, is just a sort of soy sauce, so I guess I have that one too! But if you can find these ingredients you can always give it a try! I’d probably go around smelling every single ingredient and then deciding which one I want most of in my sauce! Then add a little more of everything until I think it tastes right. A good way to go right?
Spinach with sesame dressing
The next side dish I made for my Japanese cooking night was spinach with sesame dressing! Which means another hour wasted on crushing sesame seeds. It wasn’t all that bad though. It gives you something to do and time to think! Also I learned spinach is also something that, once it’s cooked, I’d rather eat warm.
Ingredients:
Salt
400 grams spinach
50 grams sesame seeds
2 teaspoons sugar
1 spoon sake
2 spoons chicken broth
3 spoons soy sauce + extra
1. Put water and salt in a pan and cook until it boils. Then add the spinach en cook for another minute.
2. Once the spinach is cooked take it out immediately and cool it in cold water. Take some of the spinach and line it on a bamboo mat. Then roll the bamboo mat and squeeze the water out. You should get a compact string on spinach now.
3. Cut the string into smaller pieces and use some soy sauce to sprinkle over it.
4. Bake the sesame seeds in a dry pan until dry and crush them immediately after.
5. Mix the sesame powder with the sugar, sake, broth and soy sauce. Put little bits of the mixture on the spinach and serve!
I admit this probably sounds quite vague. I tried googling it but I that doesn't give the best pictures either. Hopefully you’ll get a picture of little spinach pieces with a little with of sesame dressing on it that has a bit of a sushi-feeling! It might be a nice idea next time to leave some of the sesame uncrushed and to not burn them as well. (I have the excuse of me trying to make 4 dishes at the same time! I just lost sight of the sesame for a little moment!) Anyway, enjoy!
Subscribe to:
Posts (Atom)