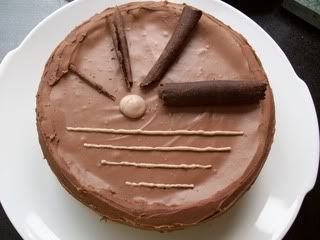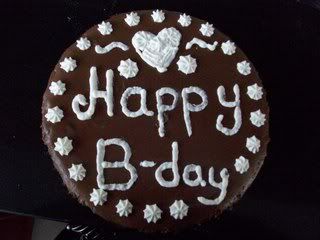
For this recipe you're going to need chocolate. My first cake was with 70% cacao dark chocolate. A higher percentage of cacao does give the cake a better taste, but as the cake is rich enough by itsself, I wouldnt recommend using dark chocolate. I don't really notice it myself, but I ate the first cake all by myself, because the rest of the family thought it was too rich XD The second time I just used milk chocolate drops and didnt bother with the quality of the chocolate..
One thing you have to keep in mind with this recipe that you make sure that the filling doesn't get too wet and that you dont bake it for too long. It burns pretty fast and when you leave it to cool, it will also harden a bit too..
Another thing that gave me some trouble was the cream cheese. Over here, we don't have "cream cheese" as a product in a bucket or so, but we have many different kinds that would supposedly fall under the cream cheeses xP So, if you can just buy cream cheese over there, use it! If you have no clue where to get it, things like mon chou, philadelphia and mascarpone will do too. Mon chou makes the filling a bit sour, philadelphia and mascarpone make it more creamy. ^^ I started off with mon chou, but the second time I took half philadelphia and half mascarpone.. that worked a lot better for me ^^
Before I really give you the recipe xP I just have to say a few things. In the cookielayer, you have to use butter. Unsalted butter does give it a better taste, but if you don't have it, feel free to use salted butter or any other butter you can find.. The original recipe used unsweetened cacao powder, but why not use sweetened? You can also variate the chocolate (that remind me I should try it with white chocolate!), cream cheese and also the digestive cookies. Crushed chocolate wafers would also taste very nice as a cookielayer ^^
Ingredients:
Cookielayer:
24 digestive cookies (or 150 grams)
1 tablespoon sugar
1/4 cup (unsalted) butter (about 60 ml melted butter)
Filling:
275 grams chocolate
900 grams cream cheese
1 1/4 cup and 2 tablespoons sugar (240 grams)
1/4 cup (unsweetened) cacao powder
4 large eggs
Topping:
3/4 cup whipping cream
170 grams chocolate
1 tablespoon sugar
Decoration :) (I used the whipping cream I had left for this, and mixed in some chocolate. For this, make sure to first 'whip the cream' before you add other ingredients)
Cookielayer:
1. Start off with greasing a 18-20 cm cake pan (7-8 inch).
2. Put this aside and start with the cookies. It's easiest to crush these in a mixer, but feel free to do it by hand! Mix the sugar in and leave it to melt the butter. Mix the butter in too.
3. Take the cake pan and put the cookie-sugar-butter stuff in and press it evenly to the bottom. Leave it in a pre-heated oven at 175 degrees Clesius (or 350 Fahrenheit) for about 5 minutes (or 15 minutes if not pre-heated).
Filling:
1. Doubleboil the chocolate untill everything is melted. Take the pan off the pan with water and let it cool for a while (make sure it stays pourable).
2. In the mean time you can measure the right amount of cream cheese, sugar and cocao powder and mix these in a mixer.
3. Blend in the eggs, one at a time!
4. Add the chocolate to the mixture and blend again.
5. Pour the filling over the cookiecrust and put it in a pre-heated oven of 175 degrees Celsius (or 350 Fahrenheit). Let it set for about 1 hour, or just until the top of the cake looks dry (beware of burning!!).
6. When it looks done, take it out of the oven and let it cool.
Topping:
1. Doubleboil the chocolate untill it's melted.
2. Take the pan off the bigger pan with water and add the whipped cream. Use a handmixer to mix these together, or poor it into a mixer.
3. Pour the topping over the cake and make sure it fills all the cracks. If you want the sides to have some topping as well, leave some aside or make more later on. It gives a nice effect if you pour the topping in just the middle, so that it doesnt touch the edges.
4. Put the cake into the fridge and leave it for about 1-2 hours until the topping is set. Don't wait for it to become hard, like chocolate, the topping will stay a bit soft.
5. If you want to do the sides too, take the cake out of the fridge and use the topping you have left to spread it onto the sides. It can be quite a pain in the ass to get this smooth though!
Then you should have a wonderful cake ^^ I actually still have a picture of the first time I made this recipe. It was a bit burned, way too rich and I actually might have overdone the decoration XD You can actually see the difference between this dark chocolate cake, and the milk chocolate cake you can see above.


No comments:
Post a Comment