Sunday, November 25, 2012

Chocolate Eggnog

My mom keeps buying me lovely things for my baking and photography. A little while ago she brought me a tin box with recipe cards in it. The tin box was ‘covered’ in chocolate shavings and cacao and every single recipe included chocolate. So I sat down and picked some things that looked interesting. One of them was a chocolate drink that included egg. I don’t think I ever had egg in a drink so I thought it was funny enough to try. Before I even tried it I heard it was a chocolate version of the famous eggnog! I got totally exited! Do you have any idea how many times I’ve seen eggnog in movies and on pictures or heard about it from people? I never got the chance to drink it myself!


So I made it. As soon as I possibly could! And wow! It was like drinking chocolate mousse, so fluffy and chocolaty and oh, just lovely! I thought it was amazing. I wonder why we haven’t invented this here in Holland yet. Also, something I never knew: when making or drinking this you’ll notice it’s cold. It’s supposed to be a cold drink. For around 4 people in case anyone is wondering.

Ingredients:
3 eggs
350 ml milk
60 grams cacao
60 grams sugar
Whipped cream
Chocolate shavings
Sugar for the rim of the glasses

1. Separate the eggs. Take the egg yolks (yellow) and mix them in a bowl until creamy.
2. Put the milk with the cacao and 40 grams sugar in a pan over medium heat and stir until dissolved. Make sure the milk doesn’t boil or burn!
3. Add one or two spoons of the hot milk to the egg yolks and stir immediate. Then poor the egg yolk-mixture into the pan with milk and keep stirring on medium to low heat until the mixture thickens. Take the pan off of the heat and leave to cool for about 30 minutes.
4. After 30 minutes, take the egg whites and mix them until fluffy and stiff. Add 20 grams of sugar and mix again.
5. Use a spatula to stir the fluffy egg whites into the chocolate mixture.
6. Poor the eggnog into glasses (with a sugar rim) and top it with whipped cream and chocolate shavings. 


For anyone who doesn’t know how to make that pretty sugar rim on glasses: really all you need to do is dip the rim into water and then dip it into sugar. You can add cinnamon or cacao to the sugar beforehand to give it something extra!

While making these pictures I tested a new technique for the background. I used one big cloth for the bottom and the back of the picture. It’s a pretty odd setup and even though you can quite obviously see the creases of the cloth (if you look at the background and not the lovely drink), I was satisfied with the result. I thought it gave the pictures a nice feel. I hated the fact that I used glass though. To be fair, I insisted on using glass, because it would nicely show off the chocolate ‘mousse’ together with the whipped cream and it did look lovely. But once I took a picture: look at those reflections! They were everywhere! There was no way to get rid of them either! 


I hope you enjoyed my explorations of new recipes and photographing techniques and I’ll make sure to post more soon! For those reading this around Christmas (it is, I believe, a traditional Christmas drink): Merry Christmas!

Friday, November 23, 2012

Showing off 2: Out of the blue

There’s more pictures I can show off! Aren’t you excited? Since I’ve slowly been getting into photography more and more, I bought myself some new plates. Also my mom, who works in some sort of second hand shop, bring home a lot of odd pieces of kitchenware. It’s amazing to suddenly have so many options to start combining!


I bought a new plate, just one and nothing to match it. Everyone in the house thought it was the ugliest thing I’d ever bought. Personally I had to agree there’s no way I’d serve food on a plate like this. Not just because it’s an odd colour and design, but it’s also too 3D. Every line you see actually pops out quite a lot. But blue contrasts so nicely with orange and yellow! I mean, look at those colours popping out and screaming of colouriness!


 Even when mixing with other colours I think it turned out well:


So, that was me experimenting with more props I have now. I could show you a whole lot more, but I think I'll leave you wait for most of the pictures until I actually post the recipes. But I can share two pictures I wanted to use for a post on Frappé. I never got the pictures right though.


I mean: look at that! Who ever thought of photographing an ice coffee from above? There's not going to be a lot of people who can guess what this is. The next picture is a bit more obvious. I took it when I was messing around with the props for a Mocca-Chocolate Marbled Madeira Cake (I just named it, I'll post the recipe some time too!). Enjoy and till next time!

Showing off: Spiced Apple Cake

I've had a new camera for a while now and I’ve only made two posts with pictures I made with that camera. Of which one was made in such a hurry you don’t even notice the difference! So it’s time I showed off my new camera skills. Just, not today. However, I do want to show what kind of lovely pictures I made with my ‘old’ camera just before I got my big Nikon.
So this time I’m showing off pictures of a Spiced Apple Cake I posted before. I didn’t have any dates that time so I used raisins instead. Also, I didn’t have any walnuts so I scratched that as well. Really I only made the cake to get rid of the apples I didn’t like.
That was last summer. Can you imagine how far behind I am with posting? Just thinking about the amounts of work I have to catch up make me want to run away and hide.


Last summer I spent a lot of time getting into and reading up on food photography. One of the books I read was From Plate to Pixel from Hélène Dujardin. It was amazing how many things were in that book that could help me with my work. Unfortunately a lot of them needed photography equipment as well. Now, I don’t have diffusers, reflectors, studio lights, umbrellas, scrims and whatnot (don’t ask), but I did learn a few neat tricks. For example: making apples look fresh by spraying water on them. I think it makes them look so delicious! 


I messed around with the different props I picked out for my pictures. Some of the things I came up with aren't half bad, don't you think?
Apart from messing around with the materials when I was making the pictures, I also did a bit of editing afterwards with Photoshop. I'm starting to really like the options I have on there. I figured out now, that if I wanted I can turn the apples on the pictures from green to red. Isn't that amazing? With these pictures I only messed with things like contrast and vibrance, so for my blog I'm really going to stick to the easy things.


Lastely, I've been messing around on my blog as well. Did you notice these pictures are a lot bigger? Do you think it's a lot better like this? 
I hope you enjoyed the pictures! Don't forget to look at the recipe here.
 
Edit: I think I actually quite like how the pictures are now (slightly bigger size, centered) compared to before. I think I will stick to this!
Also: why is there so much space between the title and the text? Its like I put a few enters inbetween! Someone solve it!!

Saturday, November 17, 2012

Sister's 17th Birthday

Photobucket

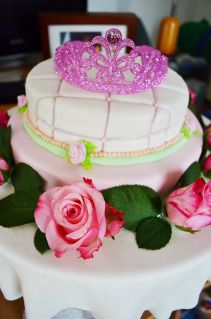
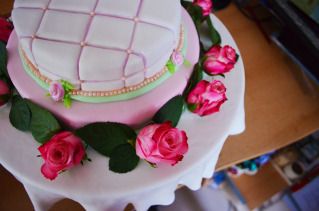
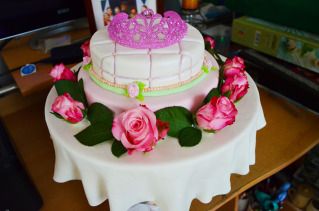
It’s been WAY over a month ago since I last posted something! It’s almost disgraceful. But rather than the usual bit of lazy I’ve actually been very busy. One of the first things I made after my last post of Pumpkin Soup was my sister’s 17th Birthday Cake (or is it 17th birthday birthday cake?). It was quite a challenge. So far I’ve always said I disliked making fondant cakes. Somehow I always felt they were very plain tasteless cakes with a far too sugary layer over it and way too many decorations to ever eat. Where was the actual food experience? Something to make your taste buds go wild? I took it back after making a good fondant cake myself. Well, admittedly the taste itself wasn’t spectacular. But making a fondant cake proved to be a lot of fun.

Photobucket

I can’t give you a recipe for this cake. As it is a vanilla madeira cake covered in buttercream icing with fondant over it. I have recipes of the buttercream icing here. I realized I haven’t posted any recipes of the madeira cake while I’ve made SO many in the meanwhile! I’ve had an entire phase of madeira cakes in all variations and I have so many lovely pictures, but appear to have been too busy to have posted any! The fondant I used was Satin Ice White Vanilla. The same one Cake Boss apparently uses. My sister had watched a few episodes of Cake Boss and really wanted a cake of her own.  I tried to make it more eccentric like they do in Cake Boss and wanted the cake to be able to turn -by motor- and have a melody play while doing so. I got quite far with the plans but the cake was simply too heavy for the little motors I could find so eventually I scratched that plan. 

Photobucket

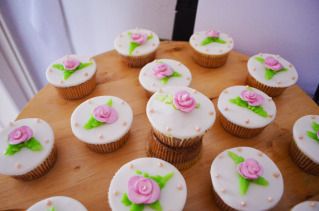
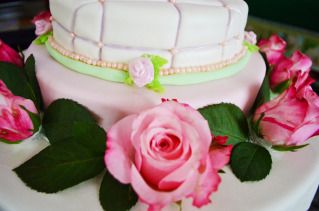
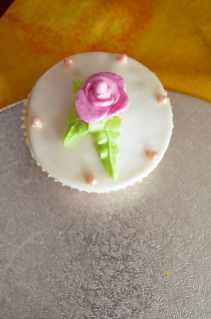
I did try to make the rest of the cake according to my sisters preferences and colours. I made the cake pearl with pink and a silver glittery shine all over. The shine is a bit hard to see on the pictures, but it’s there. I also went with roses, since she really wanted flowers on her cake. In the end her cake looked a lot different than all the cakes she’d shown me on pictures. She said she loved it though. And I did too. Just like my mom, I think the cupcakes turned out a lot better. It took me two entire days making it, including cupcakes. From 9 in the morning till around 8 at night. I've never spent so much time making a cake. It was absolutely tiring, but well worth the experience!

Photobucket

Actually, just because I can’t give you a recipe, doesn’t mean I can’t in any way help in case you want to make a cake like this yourself. There’s a few things I learned while making this cake:
- If you leave fondant out in the air it will DRY OUT until it is very very hard. And that process actually starts while you’re still kneading!
- Also, if you leave the cake, with fondant, in the fridge or leave the little fondant flower between wet paper towels to counteract the previous point, the fondant will actually melt. Your flowers will be little dots of colourful goo and your cake will need to dry for quite a while before you can actually work with it. 

Photobucket

- Although you need only a little bit of buttercream to make the fondant stick to the cake and prevent crumbling, it tastes SO much nicer when there’s a lot of delicious buttercream in between!
- Think high! The layers of my cake should have been higher. I should have used two cakes for each layer and stacked them very high. It’s not that it was bad, it would’ve just been so much better and impressive if it was taller than about 15 cm/6 inch high. Also, don’t make the bottom layer part of the cake stand. Has anyone noticed my cake has 3 layers?
- Especially when it’s your first time: just enjoy making it. Don’t think too big and be proud of yourself afterwards!

Photobucket

I hope you guys enjoyed the pictures and the ranting! Please look forward to new recipes soon! I’ve got some nice new stuff coming up!